Showing posts with label Blogger News. Show all posts

How to Add Tweet Box to Blogger

 How to Add Tweet Box to Blogger 
It has been a long time since @Twitter released the @AnyWhere Developer Tool. AnyWhere allows you to seamlessly integrate Twitter into your site using a few lines of JavaScript. You can read more about it at  @AnyWhere Developer Page. Tweet Box is one such @AnyWhere Application, which allows you to add a 140 char Tweet Box onto your blog.
Here is a screen shot of how the Tweet box appear on my Previous Post.
image
Hope that now you got a good idea of how this works, If not scroll down to the bottom of the post and see it in live action :)

How to add the Tweet Box on a Blogger Blog?

1. Go to the @AnyWhere Developers Page and create an Application there with your blog details.
image
Make Sure that you have checked the Read & Write Option when you Register your Application
2.When you complete the signup process, you will get some JavaScript codes, with a unique  API Key
Copy out the JavaScript from there(the code in the red box) as shown in this Screenshot.
image
3.Now Login to your Blogger Dashboard and navigate to the Edit HTML Tab under Design and “Expand your Widget Templates”
4.Look for
</head>
and paste the copied Twitter JavaScript just above that line and save the template. 5.Now look for
<data:post.body/>
and immediately below that paste the following JavaScript Code and save your template. (Editable parts are shown in red)
<b:if cond='data:blog.pageType == &quot;item&quot;'>
<div id='bp_tweetBox'/>
<script type='text/javascript'>
bp_tweet_link=&quot;<data:post.url/>&quot;;
twttr.anywhere(function (T) {
T(&quot;#bp_tweetBox&quot;).tweetBox({
width: 560,
label: &quot;Share the L&#10084;ve  &amp; Retweet&quot;,
defaultContent: &quot;RT @bloggerplugins <data:post.title/>&quot;+&quot; &quot;+bp_tweet_link
});
});
</script>
</b:if>
Now you should see the Tweet Box on all of your post pages
Currently, this doesn’t do any URL shortening . You can expect that it my next post. I will  also try to post about the other @AnyWhere features soon :)
Share your opinions and if you have any questions about the tweet button, feel free to ask :)


अथ श्री एग्रीगेटर कथा

अथ श्री एग्रीगेटर कथा


डिस्क्लेमर: पोस्ट ऐसे ही मौज में लिख दी गयी है, इसलिए सतही है. किसी गंभीर विश्लेषण की उम्मीद न रखें. जरूरी काम निपटाने के बाद ही इधर समय दें :) :)

आजकल हिन्दी ब्लॉगजगत में 'एग्रीगेटर संकट' की बड़ी चर्चा है. हर दो-तीन दिन में किसी न किसी ब्लॉग पर एग्रीगेटर्स की शोक-सभा दिख जाती है. हर कोइ आकर अपने श्रधांजलि अर्पित कर जाता है, कोइ कहता है कि फलां एग्रीगेटर के जाने से जो स्थान रिक्त हो गया है उसे भरना असंभव है, कोइ कहता है हमें उनके बिना काम चलाने की आदत डालनी होगी. फिर कोइ आकर दिवंगत एग्रीगेटर की जगह एक नए एग्रीगेटर के निर्माण का आह्वान करता है, बाकी लोग जोश में आकर जोरदार समर्थन करते हैं. घनघोर हल्ला मचता है. फिर लोग चद्दर तान के सो जाते हैं..

एग्रीगेटर का महत्व हर भाषा के ब्लोग्स में रहा है. इससे लोगों को ताजा सामग्री एक जगह मिलती रहती है. उस दिन की कुछ अच्छी पोस्ट्स भी एक जगह पढने को मिल जाती हैं. अंगरेजी के ब्लोग्स में अगर पाठक तत्काल न आ पाए तो बाद में काम की सूचना को गूगल पर ढूंढता हुआ आ जाता है. और अंगरेजी के पाठक इतने हैं कि ऐसे भूले-भटके पाठकों की संख्या भी ठीक-ठाक होती है. पर एक तो अपनी हिन्दी में कोइ गूगल सर्च नहीं करता, सिवाय हिन्दी के विद्यार्थियों/साहित्य प्रेमियों और खुद ब्लोगरों को और फिर जिन विषयों पर अधिकाँश हिन्दी ब्लोगर लिख रहे हैं शायद ही उनके लिए कोइ गूगल सर्च करेगा. अब जो बहुत पुराने ब्लोगर हैं, जिनका नाम स्थापित है उन तक तो पाठक किसी तरह पंहुच ही जाते हैं. कुछ वास्तव में उनके लेखन को पढने के लिए तो कुछ सिर्फ इसलिए कि उन ब्लोगों पर ज्यादा लोग आते हैं तो शायद वहाँ से कुछ पाठक मुझे भी मिल जाएँ.

नए ब्लोगर्स के लिए समस्या बड़ी गंभीर है. जाहिर है आप कालजयी लेखन न भी कर रहे हों तो भी ये तो इच्छा रहती ही है कि कुछ लोग पढ़ें आपको, कुछ बोलें उसपर. लेकिन लोगों को पता तो चले. अब इसके लिए या तो सबको थोक भाव में ई-मेल (जिसको आप तकनीकी भाषा में स्पैम कह सकते हैं) भेजा जाए या फिर लोगों के ब्लोग्स पर जाके बेमतलब गरिया आयें, वो बदला लेने आएगा ही, या फिर कुछ मीठा ही बोल आयें, शायद गदगद होकर श्रीमान अपने भक्त को देखने आ जाएँ. कई तरीके हैं और मेरे हिसाब से कोइ गलत नहीं है. अभी कुछ दिन पहले एक एग्रीगेटर शोक सभा में ही किन्ही का वक्तव्य पढ़ रहा था कि एग्रीगेटर के टाइम में कई बार नए और फालतू ब्लोगर भी भड़कीला शीर्षक देकर पाठक बटोर लाते थे. सही बात है. पर हमें यह समझना चाहिए कि हिन्दी ब्लोगिंग अभी बचपन के दौर में है, या यों कहें कि डायपर में ही है. अभी काफी दूर जाना है इसे. अभी तो नेट पर हिन्दी में कुछ है ही नहीं. छोटी-छोटी भाषाओं में इससे ज्यादा सामग्री उपलब्ध है. अभी समय है कि कोइ हिन्दी में कैसा भी लिख रहा हो, कैसे भी पाठक बटोर ला रहा हो उसको प्रोत्साहित करने का. वैसे आप कौन से तीर चला रहे थे कम्प्युटर पर बैठ के. बेचारे की पोस्ट पढके कुछ लिख दीजिये. आदरणीय समीर जी और संगीता पुरी जी जैसे कुछ ब्लोगरों का नाम उल्लेखनीय है इस काम के लिए. एक बार हिन्दी में पर्याप्त सामग्री हो जाए नेट पर, लोग सर्च इंजनों के जरिये आने लगें फिर गुणवता के आधार पर छांट कर पढ़िए. फिर एग्रीगेटर बनाने के लिए मनुहार नहीं करनी पड़ेगी. खुद बड़ी कम्पनियां आगे आयेंगी.

कुल मिलाकर एग्रीगेटरों की कमी तो खल रही है. एक दो नए-नए एग्रीगेटर हैं बाज़ार में पर उनमें ब्लोगवाणी वाली बात नहीं दिखती. एक इंडली है- उसमें एक तो हर पोस्ट जाकर मैनुअली फीड करनी पड़ती है और दुसरे उसपर ज्यादा लोग जाते नहीं तो फिलहाल तो ज्यादा उम्मीद करना बेकार ही है उससे. एक दो और हैं जैसे रफ़्तार और हमारीवाणी पर उनका फंडा मुझे आज तक समझ नहीं आया. कभी कोइ पेज नहीं खुलता,  कभी ब्लॉग नहीं जुड़ता और जुड़ जाए तो पोस्ट नहीं दिखती. इधर एक दो नए प्रयास किये गए हैं जैसे हिन्दी ब्लॉग-जगत और ब्लॉग परिवार. ये प्रयास निश्चित रूप से सराहनीय हैं. अगर अलग अलग क्षेत्रो और थीम्स से जुड़े ऐसे-ऐसे कई ब्लॉग बन जाएँ तो एक पूर्ण एग्रीगेटर की कमी को पूरा किया जा सकता है.

बाकी एक लाइन में निष्कर्ष यह है कि बच्चा, पाठकों की संख्या और टिप्पणियों के पीछे मत भागो सामग्री की गुणवता पर ध्यान दो. पाठक झक्क मारकर पीछे आयेंगे. :) अभी नहीं तो २-४ साल बाद. मेरे जैसा चालू टाइप मत लिखो, भाई लोगों के ब्लोग्स से सीखो ;)

ब्लॉगिंग ये रोग बड़ा है जालिम

ब्लॉगिंग: ये रोग बड़ा है जालिम


ये ब्लोगिंग की लत किसी नशे की लत से कम नहीं होती. ये मैं अपने अनुभव से बता रहा हूँ और मेरा अनुमान है कि आपमें से अधिकाँश लोग मेरी बात से सहमत होंगे. इस पोस्ट में ब्लोगिंग के साथ अपने अब तक के अनुभव को आपसे साझा करूँगा.

ये मेरे नए ब्लॉग या कहें कि ब्लोगिंग की इस पारी की पहली पोस्ट है इसलिए शुरुआत ज़रा बैकग्राउंड से करना सही रहेगा. पहली बार 'ब्लॉग' शब्द शायद २००३-०४ के आसपास सुना था. नया नया एनसीआर (गाजियाबाद) आया था. कम्प्यूटर पहली बार वहीं देखा और यूज किया. तब ब्लॉग का मतलब बस यही समझ में आया था कि इससे मुफ्त में वेबसाईट बन जाती है.. और आपको पुरी दुनिया उसपर देख और पढ़ सकती है.. नेट पर अपना नाम देखने का ही अलग चाव था. फोटो देखना सभव नहीं था क्योंकि डिजिटल कैमरे और स्कैनर तक पहुँच नहीं थी उस वक्त. तो एक ब्लॉग बनाया हमने भी. करना क्या है ये नहीं पता था. तो वही किया जो बहुत से नए ब्लोगर शायद आज भी शुरू में करते हैं. हिन्दी साहित्य के एक पोर्टल पर जाकर दो चार कवियों की कविताएँ कॉपी की और अपने ब्लॉग पर चेप दीं (कॉपीराइट किस चिड़िया का नाम है, नहीं पता था). और सीना चौड़ा करके रूम पर आ गए (ये क्रांतिकारी कार्य साइबर कैफे में २० रूपये कुर्बान करके हुआ था). लगा कोइ बड़ा किला फतह कर लिया है. ब्लॉग ट्रैफिक वगैरह तकनीकी  चीजों का पता नहीं था. मुझे तो लग रहा था की लाखों लोग अब मेरे ब्लॉग पर आ रहे होंगे.

उसकी बार जब भी कैफे जाता ब्लॉग को खोलकर देखता और बस मन गदगद हो जाता. फिर २००७ में दिल्ली आया. तब तक वो ब्लॉग तो वहीं का वहीं था.. पर कम्प्युटर के बारे में तकनीकी ज्ञान ठीक-ठाक हो गया था. दुनियादारी की समझ भी थोड़ी बढ़ गयी थी. फिर जे एन यू आया तो एक अच्छा एकेडमिक और वैचारिक वातावरण मिला जिसका प्राइवेट इंस्टीट्यूट्स में अभाव होता है. फिर एक नया ब्लॉग बनाया- नाम रख दिया जेएनयू. कुछ महीने बाद महसूस हुआ की नाम उचित नहीं था. सुनने से जेएनयू का आधिकारिक ब्लॉग मालूम होता था. पर फिर छोड़ दिया लापरवाही में. शुरू में तो ब्लॉग पर काफी जोर-शोर से पोस्टिंग की पर फिर धीरे धीरे आलस बढ़ता गया और साथ में पोस्ट्स के बीच का अंतराल भी. फिर करीब करीब बंद ही हो गया. और भी एक दो ब्लोग्स थे जो ठहर-ठहर के चलते चलते बंद से ही हो गए.

इस साल के शुरू में कोरिया सरकार की स्कोलरशिप के लिए अप्लाई कर दिया; मिल भी गयी. अगस्त, २०१० में  कोरिया आ गया. यहाँ एक तो बात करने वाला कोइ नहीं, सोचने का समय काफी. ब्लोगिंग का कीड़ा फिर कुलबुलाने लगा. सोचा, पैसे हैं अपना डोमेन और वेब होस्टिंग लिया जाए, थोड़ा सीरियसली ब्लोगिंग की जायेगी. कई सारे वेब-होस्टिंग पैकेजेज पर रिसर्च किया. सालाना करीब करीब ५०-६० डॉलर का खर्च था. पर अपने आलसपन पर शक था अभी भी. कहीं एक-दो महीने बाद जोश ठंडा पड़ जाए तो पैसे बेकार.. फिर एक दिन नेट पर भटकते हुए दिल्ली की एक कपनी का विज्ञापन देखा जो मात्र ९० रूपये में .in वाले डोमेन बेच रही थी. हमने फोन लगाया बात हुई और दिल्ली में एक मित्र को बोलकर कंपनी के अकाउंट में पैसे ट्रांसफर करवाए. दो डोमेन खरीदे- www.topikguide.in जो कि कोरिया भाषा क्षमता परीक्षण की तैयारी से सम्बंधित है और दूसरा scsatyarthi.in जिसके एक सब-डोमेन  http://korea.scsatyarthi.in/ पर यह ब्लॉग है. फिलहाल कुछ समय तक गूगल ब्लोगर पर फ्री होस्टिंग की ही सेवा लेने का निर्णय लिया. बाद में मन हुआ तो खुद होस्ट किया जायेगा.

शुरू में बड़ी टेंशन का विषय था कि ब्लॉग हिन्दी में बनाया जाये या अंगरेजी में. लगा अंगरेजी में यह ब्लॉग एक ज्यादा बड़े टारगेट तक पहुँच पायेगा और अधिकाँश इन्टरनेट यूजर्स को अंगरेजी आती ही है. पर फिर लगता यार हिन्दी मातृभाषा है. भले ही कम लोग पढेंगे हिन्दी में पर उनसे जो अपनापन मिलेगा वह अंगरेजी में संभव नहीं. और अंगरेजी में पहले से हर विषय पर पहले से हजार ब्लॉग हैं- कोरिया पर भी; हिन्दी में सामग्री का अभाव है नेट पर....  इस तरह के ढेर सरे तर्क वितर्क.. अंत में हिन्दी की ही जीत हुई.

 आपका स्वागत है इस नए बसेरे पर.. आप थोड़ा उत्साह बढाते रहेंगे तो लिखने का जोश बना रहेगा.. लिखने की शैली बोरिंग है पर झेल लीजिए.. आगे सुधारने की कोशिश करूँगा. खासकर ब्लॉग जगत के पुराने धुरंधरों से विशेष स्नेह और मार्गदर्शन चाहूँगा.. ;)


Display Custom Search results on a separate page

Display Custom Search results on a separate page

How did you do to display the search results on separate page of your blog like that? That’s a question asked by a reader recently. (If you don’t have the slightest idea what the reader was talking about, see the results page in action by searching something using the search box above. You’ll know what he meant). This tutorial will answer that question.

It will explain how to make your Google Custom Search results show up on a (Blogger) dedicated page , instead of on some page on Google. This tutorial is applicable only for search box created in Google Custom Search or AdSense for Search. It’s not going to work with Search Box gadget added via Design > Page Elements.
Here we go:

I. Create the search result page

  1. Go to Posting > Edit Pages > New Page to create a page for displaying the search results.
  2. Put in the title. Don’t put any content yet inside the page, leave it blank.
  3. Publish it.
  4. Copy the URL of the page.

II. Creating Google Custom Search codes

  1. Go to Google Custom Search (opens in a new tab/window) and select your search engine.
  2. Click the Look and Feel link.
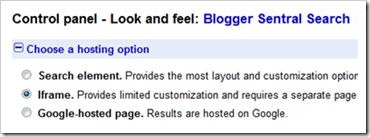
  3. On top of the page, under Choose A Hosting Option heading, you will be given three options. Choose the second option –Iframe. custom search hosting option
  4. Scroll down and click the Save button. After that click the Get Code button.
  5. In the get code page, enter the URL of your search page in the Specify search results details text box.
  6. You will be given two sets of code. The first is the code for the search box, and the second one is the code for search results.

III. Applying the codes

Applying search box code
You have two options:
  1. If you want to add a search box that looks the same as previewed on Look and Feel page, just copy the search box code and paste it in a HTML/Javascript gadget.
  2. If you’ve already added a custom search box (like the one explained in Add Custom Search box to navigation bar) and want to keep it as it is, you just need to update the code. Here’s how:
    1. Change the existing URL of the action attribute from http://www.google.com/cse to the URL of your search results page. 
    2. And insert this line right before </form>:
      view sourceprint?
      1<input type="hidden" name="cof" value="FORID:10" />
Applying search results code
  1. Copy the search results page code (from the second box).
  2. Go back to post editor to edit your search result page.
  3. Switch to Edit HTML mode and paste in the code.
  4. Publish.

That’s all to it! You can now test the search box, see if it works.
You should see your search results occupy your the post area. Want to customize the page –i.e. remove the sidebars, or make the search results occupy the full width of blog area? Easy, read about it here: Apply different layout/styling to static pages.
Enjoy!

Installing Google translator widget with flags

IDFR CNJP SAIN NLESVN
Want to reach wider international audience? What better way to do it than by allowing your readers to read your articles in his or her own language!
Installing a translator on your webpage or blog will do just that. Google translator can translate your web page into 56 languages (as of 24 August 2009).
In this tutorial I will show you how to add a Google translator widget with the corresponding nation’s flag icons.
Without further ado,
  1. Login to your to your Blogger account.
  2. Go to Design > Page Elements.
  3. Click Add A Gadget.
  4. In Add A Gadget window, select HTML/Javascript.
  5. Enter the title of your widget e.g. Translate This Page. This is optional.
  6. Copy the code below and paste it inside the window.
  7. Click Save.
1<!-- Translate flag BEGIN -->
2<!-- by www.bloggersentral.com -->
3<a class="translate-flag"
4onclick="href='http://translate.google.com/translate?u='+encodeURIComponent(location.href)+'&amp;langpair=SourceLangCode|TargetLangCode&amp;hl=InterfaceLangCode'" title="Translate to TargetLangName" target="_blank"><img border="0" style="cursor: pointer;" src="FlagIconURL" /></a>
5<!-- Translate flag END -->
Where:
  • SourceLangCode is the code web page original language, TargetLangCode is the code for language you want the page translated into, and InterfaceLangCode is code for Google translator bar language.
  • TargetLangName is the name of targeted language.
  • Replace all those variables with their respective Google language codes and language name. Refer to the table below.
    Language name Code Language name Code Language name Code
    Albanian sq Hungarian hu Turkish tr
    Arabic ar Indonesian id Ukrainian uk
    Bulgarian bg Italian it Vietnamese vi
    Catalan ca Japanese ja Afrikaans af
    Chinese (Simplified) zh-CN Korean ko Belarusian be
    Chinese (Traditional) zh-TW Latvian lv Icelandic is
    Croatian hr Lithuanian lt Irish ga
    Czech cs Maltese mt Macedonian mk
    Danish da Norwegian no Malay ms
    Dutch nl Persian fa Swahili sw
    English en Polish pl Welsh cy
    Estonian et Portuguese pt Yiddish yi
    Filipino tl Romanian ro Afrikaans af
    Finnish fi Russian ru Belarusian be
    French fr Serbian sr Icelandic is
    Galician gl Slovak sk Zulu zu
    German de Slovenian sl    
    Greek el Spanish es    
    Hebrew iw Swedish sv    
    Hindi hi Thai th    
  • FlagIconURL is the link to the nation flag representing the target language. You can download free flag icons from Custom Icon Design, FamFamFam or MarkFennel.com. Then upload the ones you need to an image host such as Photobucket, Flickr or Picasa. Once uploaded, get the link to each image an use it to replace FlagIconURL.
I’ve put a class name to the code, so you can easily style the flag if you want. Add the codes below before or after the translator code.
1<style>
2.translate-flag img {
3/* add styling codes here */
4}
5</style>

Here is a working sample of actual translator flags and their codes. The first one translates from English to Indonesian, with English interface. The second one translates from English to Spanish with Spanish interface.
IDES
1<!-- Translate flag BEGIN -->
2<!-- by BloggerSentral.blogspot.com -->
3<a class="translate-flag" onclick="href='http://translate.google.com/translate?u='+encodeURIComponent(location.href)+'&langpair=en|id&hl=en'" title="Translate to Indonesian" target="_blank"><img border="0" style="cursor: pointer;" src="https://blogger.googleusercontent.com/img/b/R29vZ2xl/AVvXsEgaYlTAWRjgcQ02smGWsQSPZ1uTPHAmhHUV31z3NVUa5dSeVYTae0pJsfwLzh-eMgIQ2R7Oom4la0tkoMvRpC67pMmbMrQClMQuXh-OGoxijXhw91mIX5ehKBiUxocDSDg2kRz72iyxwcZL/" /></a>
4<a class="translate-flag" onclick="href='http://translate.google.com/translate?u='+encodeURIComponent(location.href)+'&langpair=en|es&hl=es'" title="Translate to Spanish" target="_blank"><img border="0" style="cursor: pointer;" src="https://blogger.googleusercontent.com/img/b/R29vZ2xl/AVvXsEirE8zzLlwPN5afTzeBm1g8Q_KYdL9LvUnBBef5sXKTs2ndyTzKuGD5VdZL3oV2kJ9RUxHIolMWubCjEbyd6gxb_eSb_NZnDNQsWvHwSth599p9VzB-MoxO5zYkcJeQA6-ImgYuDzgTFMbT/" /></a>
5<!-- Translate flag END -->

Enjoy!

Before you leave:
  • Do you find this article useful? Share it via Retweet, Share and Stumble buttons below.
  • Any suggestion, question or comment? Please post it in the comments below.
Like our Facebook page:

Style your blog pager

Style your blog pager (those newer, home and older Posts links)


This tutorial will show you five hacks to change the look of Blogger blog pager. Blog pager are those “Newer Post(s)”, “Home” and “Older Post(s)”  links at the bottom of your blog page. Here they are:
  1. Changing the text with your own text
  2. Replacing the text with an image
  3. Switch sides between “Newer Post(s)” and “Older Post(s)”
  4. Adding background to the text
  5. Removing the pager from page
Okay let’s proceed. First you have to find the blog pager code.
  1. Login to your Blogger account.
  2. Go to Dashboard > Design > Edit HTML.
  3. Back up your template.
  4. Tick the  Expand Widget Templates check box on top right of the HTML window.
  5. Look for following code:
01<b:includable id='nextprev'>
02<div class='blog-pager' id='blog-pager'>
03<b:if cond='data:newerPageUrl'>
04<span id='blog-pager-newer-link'>
05<a class='blog-pager-newer-link' expr:href='data:newerPageUrl' expr:id='data:widget.instanceId + &quot;_blog-pager-newer-link&quot;' expr:title='data:newerPageTitle'><data:newerPageTitle/></a>
06</span>
07</b:if>
08<b:if cond='data:olderPageUrl'>
09<span id='blog-pager-older-link'>
10<a class='blog-pager-older-link' expr:href='data:olderPageUrl' expr:id='data:widget.instanceId + &quot;_blog-pager-older-link&quot;' expr:title='data:olderPageTitle'><data:olderPageTitle/></a>
11</span>
12</b:if>
13<b:if cond='data:blog.homepageUrl != data:blog.url'>
14<a class='home-link' expr:href='data:blog.homepageUrl'><data:homeMsg/></a>
15<b:else/>
16<b:if cond='data:newerPageUrl'>
17<a class='home-link' expr:href='data:blog.homepageUrl'><data:homeMsg/></a>
18</b:if>
19</b:if>
20</div>
21<div class='clear'/>
22</b:includable>

You want to take notice three data tags in line 5, 10, 14 and 17. Below are the three data tags and their corresponding link texts.

Data tag Link text
<data:newerPageTitle/> Newer Post(s)
<data:homeMsg/> Home
<data:olderPageTitle/> Older Post(s)

1. Changing the text with your own

To change the link text with your own, just replace the data tag with your intended text, for example if you want to replace “Newer Post(s)” with “Newer Entries”, just replace
<data:newerPageTitle/> with Newer Entries
Note: Special characters such as “/”, “<”, “>” and quotation mark need to be converted to escaped characters, otherwise Blogger will interpret it as a part of your template code, which could potentially mess up your template. You can convert it with Quick Escape.

2. Replacing the text with an image

To use an image, replace the data tag with this:
<img src="YOUR_IMAGE_URL" />
YOUR_IMAGE_URL is the URL of the image that you are replacing the link text with.

3. Switch sides between “Newer Post(s)” and “Older Post(s)”

If you want to switch sides between  “Older Post(s)” and “Newer Post(s)”, look for something like this in the CSS section of your template code:
1#blog-pager-newer-link {
2font-size:12px;
3float: left;
4}
5#blog-pager-older-link {
6font-size:12px;
7float: right;
8}
just switch the floats - float:left; to float:right; and vice versa.

4. Adding background to the text

This can be done in CSS by applying background code to the respective HTML element classes, namely .blog-pager-older-link, .home-link and .blog-pager-newer-link.
For example to apply green background to “Older Post(s)”, use:
.blog-pager-older-link {background: #00FF00;}
To use an image as a background, use:
.blog-pager-older-link {background: url(YOUR_IMAGE_URL) no-repeat;}

5. Removing the pager from page

Two ways of achieving this:
  1. Actually remove the HTML element -by deleting the above HTML code.
  2. Hide it,  using CSS display:none. I prefer this method because it is easy to apply and easy to undo. For example if you want to remove the “Home” link, just add this code:
    .home-link {display:none}
    and if you want to remove all three links at once, use this:
    #blog-pager {display:none}
    To unhide, simply remove the added code.
Add the CSS code snippet (in no.4 and 5) right before ]]></b:skin> in your template.
If you are using a Designer template, you can also add the CSS code snippets using custom CSS editor.
That’s it. Enjoy!
Like our Facebook page: